
Unlocking a GEO Zone on Your DJI Drone
This is a step-by-step guide to unlocking your DJI drone for flying in restricted GEO zones.
You have the flexibility to temporarily unlock or self-authorize flights in a majority of GEO zones for DJI drones. Creating an unlock request requires a few additional steps, but DJI’s GEO system goes a long way to encourage newcomers, recreational users, and even commercial drone pilots to make smart, educated decisions about when and where to fly their drones.
Understanding different GEO Zones
DJI’s GEO Zone map with up-to-date flight guidance is available on the DJI Fly Safe website. Each zone is designated with a different colour:
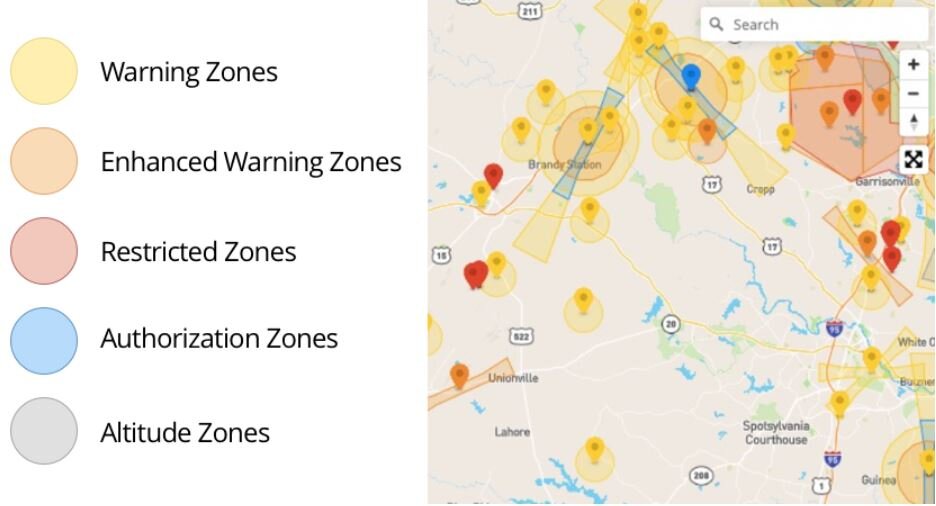
Warning Zones and Enhanced Warning Zones are advisory only and don’t require an unlock
Authorization Zones add flight restrictions and can be unlocked in the DJI App with an internet connection or a custom unlock can be requested through the Fly Safe portal
Restricted Zones (high-risk areas) and Altitude Zones (flying over maximum altitude) add flight restrictions and require a custom, scheduled unlocking license that can be requested through the DJI Fly Safe portal only
Live Unlocking vs Custom Unlocks
If you’re planning to fly in an Authorization Zone, there are two ways to unlock your DJI drone:
The DJI Pilot in-app live unlocking process
A custom unlock certificate received through the Fly Safe portal
It’s important to note that live unlocking works only when you have an active internet connection.
Alternatively, if you know in advance that your mission requires you to fly in an Authorization Zone, you can apply ahead of time for a scheduled unlock, through the Fly Safe portal which we will cover in this article later.
Live Unlocking: Unlocking a Blue Authorization Zone when you’re in the field
While Restricted Zones and Altitude Zones require a custom unlock, Blue Authorization Zones can be unlocked live, in the field.
To complete this process live:
Power on the drone and remote controller/mobile device and connect it to the internet.
When you attempt to start the props, the drone will display prompts for live unlocking
Complete these in-app prompts to keep your drone unlocked for 24 hours

When prompted with this No-Fly Zone notification in the DJI Pilot App, click OK to proceed.

Check the boxes and click OK again.

This is what you’ll see if you’re not connected to the internet. This is a good time to go back and check that your device is properly connected to the internet.

If you are connected to the internet, you’ll see this Identity Authentication screen. Enter your phone number and agree to the DJI GEO Zone Unlocking Conditions.

You’ll receive an SMS code that you can type in.
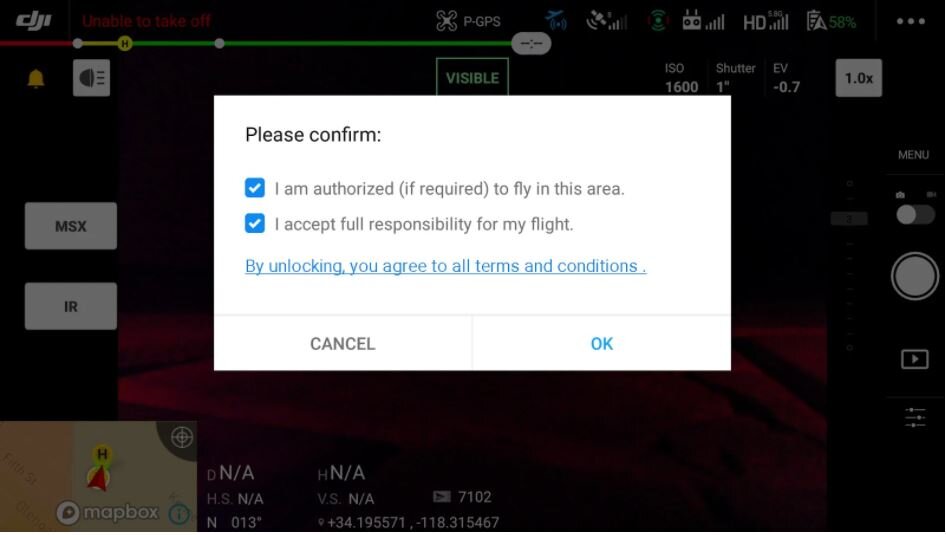
Confirm that you are authorized to fly in this area and that you accept responsibility for this flight, and click OK.

When you see this Unlocking successful notification, you’re good to go.
Custom Unlocks through the DJI Fly Safe portal
If you’re planning on flying in a Restricted Zone or Altitude Zone, then you will need to request custom unlocking in advance through the DJI Fly Safe portal. Similarly, if you’re planning on flying in an Authorization Zone without an internet connection (unable to do live unlocking) then a custom unlock will be required.
Here are the steps you will need to take for a Custom Unlock:
Setting up your account on DJI Fly Safe portal
Adding drones and pilots
Creating an Unlock Request for a DJI Drone
1) Unlock Request: Zone Unlocking
2) Unlock Request: Custom Unlocking
How long does DJI take to confirm a custom unlock?
Downloading and enabling your Custom Unlock Certificate
Setting up your account on DJI Fly Safe
This account could be personal (single drone operator), or it could represent a private organization or a government entity.
You should know that applying as an organization or enterprise increases the chances of your application getting accepted and gets you licenses with a longer validity period.
Let’s see how you can register a new DJI Fly Safe account, and add the details of the drones and the pilots.

From the DJI Fly Safe portal, you will be prompted to log in or create a DJI account. This account is what you log in with on the DJI Flight application you’ve been using, so log in with that or create an account.
Hint: Use a laptop or a desktop computer to access the Fly Safe portal since it’s still being optimized for mobile devices.

After logging in you’ll be prompted to click on the Authentication Application.

This will take you to the User Center and Background Certification tab. From there, select the applicable account type. Typically, recreational flights should select Personal Account, while Enterprise or Commercial flights should select Organisation Account.

Next, you’ll be prompted with a form to collect your basic information.
At the end, there is an option to upload a file, and this is asking for a letter, on your organization’s official letterhead, stating that your drones are used for commercial purposes. Providing this will make it more likely for your application to be accepted and for your licenses to have a longer validity period.

After submitting this info, you’ll be prompted to verify the phone number provided. You’ll need to click on Get SMS Code first, and then enter the verification code to confirm.

After this confirmation, you’ll see that Background certification is completed.
Adding drones and pilots
Next, go to the Device Management tab.

Tap on the blue + New Device button.

Enter the flight controller serial number, then select the aircraft model from the dropdown menu. You can also give a device name if you have a nickname for your drone. This is helpful if you have multiple drones, and for easier tracking for yourself through the flight control portal.
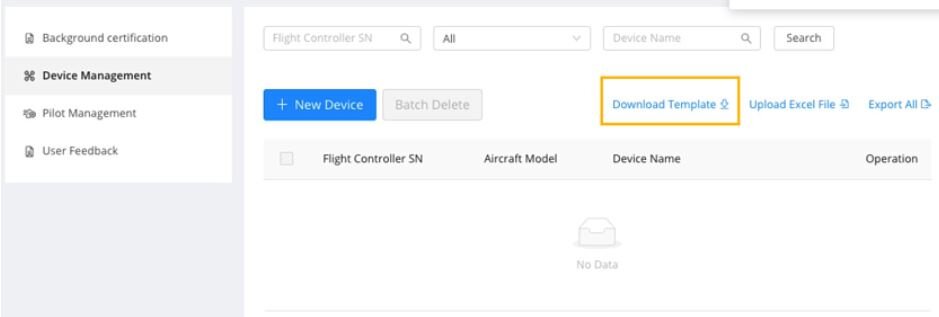
You can also download an Excel template to enter the information of multiple drones at once. Simply download the template and enter in the data as specified in the template. Make sure that the device type follows the same format as the options in the Aircraft Model dropdown menu from the portal. Save the file then upload the excel file by clicking on ‘Upload Excel File’.
Note: To find your Flight Controller serial number, follow the following steps:
Connect your drone, remote controller, and mobile device
Go to manual flight within DJI Pilot or just open up the Camera view, and tap the 3 dots on the top right to open up this menu
Then tap the three dots highlighted in green in the submenu
Then tap on About, scroll down, and you will see the Flight Controller serial number
To find your Flight Controller serial number with GS RTK and the Phantom 4 RTK:
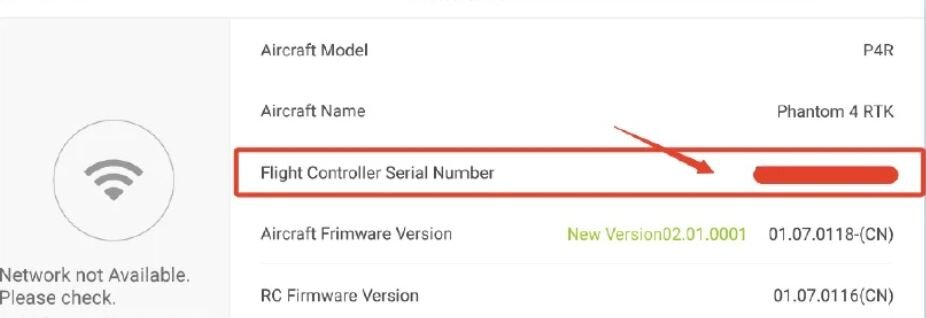
1) Connect your drone, remote controller, and mobile device
2) Go to the menu and select Aircraft
3) View the Flight Controller serial number
For pilots, select Pilot Management on the left side of the user center, and click + New Pilot


The DJI Account here is what the pilot used to log in to the DJI app that is being used.
You have the option to add a Pilot Name for ease of use. If the user doesn’t have a DJI Account they can go to www.dji.com and click on the person icon at the top right to create an account.

You can also download a template if you would like to add pilots with an Excel sheet.

At this point, you’ve completed everything in the User Center, and the nice thing about the portal is that all this information is saved to your account, so you don’t need to enter pilot or device information every time you want to raise an Unlock Request. You can come back and edit or delete your information at any time.
The final tab in the user centre is for User Feedback. If there is a GEO Zone missing or a location is closed or doesn’t exist, you can leave feedback here.

Creating an Unlock Request for a DJI Drone
After background certification and the addition of pilots and devices, you can continue to create an unlock request.
You will need to specify on the map the area where you want to fly. These map layers can be added in the shape of polygons or circles, detailing the latitude, longitude, as well as altitude.
Next, you select the date range and attach required authorization files such as flight permits, licenses, and agreements with local aviation authorities or airports.
After the application is submitted, you’d be able to check its current status on the “Unlock Request” page.
This walkthrough provides more details on how to unlock a DJI blue, grey, or red no-fly zone:

To begin, tap on Unlock Request in the top bar in the Fly Safe portal, and then + New Unlock Request.
Next, you’ll be prompted to select which type of Unlock you want.

Zone Unlocking makes sense if, for example, you have commercial operations that have been approved at a power plant, and you’d like to unlock the entire GEO zone.
Custom Unlocking makes sense if you have operations that only require flight in a portion of a GEO Zone, for example, if you have operations at an airport and there is a section that you have approval for, then you can draw a circle or a polygon of the area you want an unlock for.
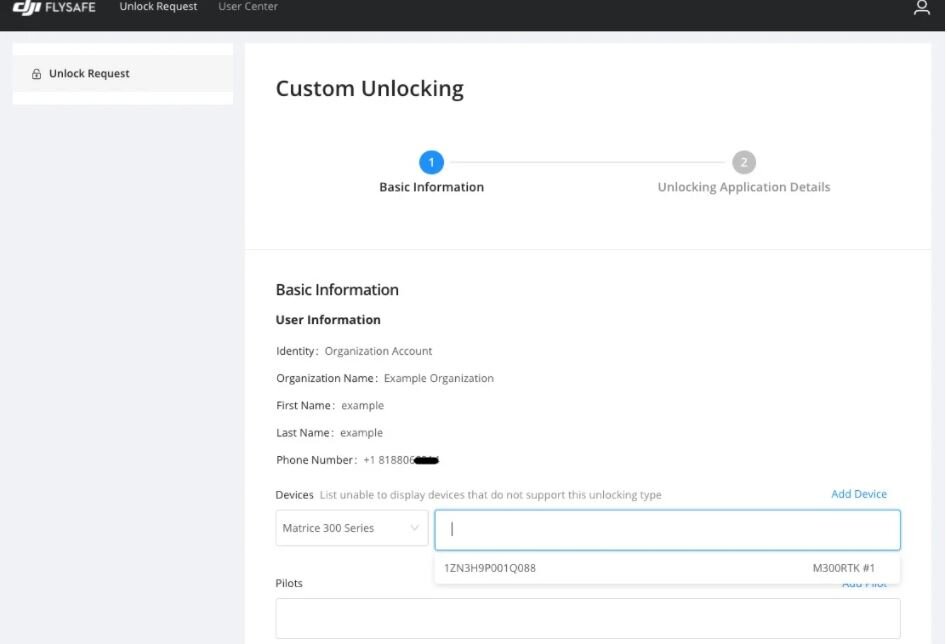
After confirming Zone or Custom, the next step is to input your basic information which is auto-filled from the User Center. Then in the Devices and Pilots text input fields, if you just click in the field it will give you a drop-down list of pilots or devices to select from.
You can select multiple drones of the same type and multiple pilots.
If you selected Zone Unlocking initially, on the next screen you’ll see a map. You can search for a location at the top left, and you can zoom in or out with the +/- at the bottom right.

Find the GEO zone you want unlocked, click on it, and it will be added to the bottom bar. You can do this for multiple GEO zones if needed. Then add the time range with start and end date for the duration of this unlock.
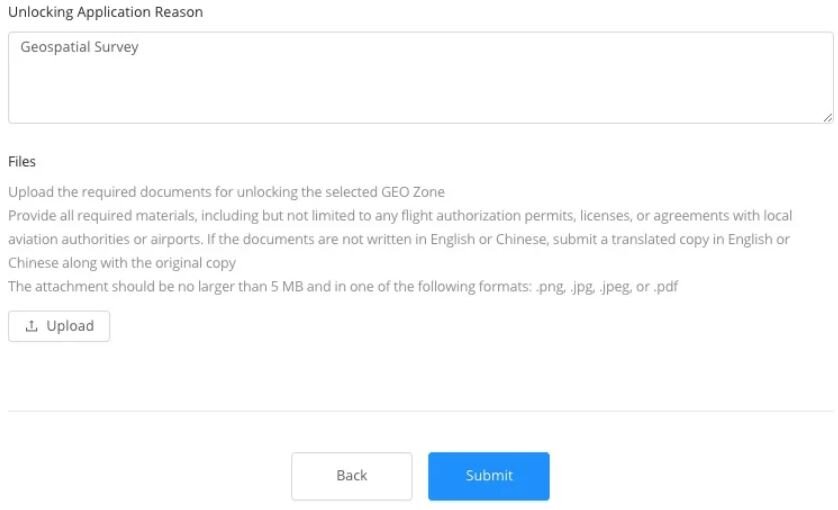
Then type in your Unlocking Application Reason and upload an authorization file per the provided guidelines. It must be a .png, .jpg, .jpeg, or .pdf and it must be less than 5 MB.
If there are special circumstances, such as the flight being indoors and regulations don’t apply, be sure to specify this here for the DJI representative who reviews this application.
Unlock Request: Custom Unlocking
If you selected Custom Unlocking, you’ll be able to draw a polygon, circle, or specify certain coordinates of where you’d like to be unlocked. You can add multiple polygons or circles.


For a polygon, click on Polygon first, then tap on the map to add the polygon vertices, which requires 3-5 points. After creating a polygon, you can tap it to edit, delete, drag or move it. Created polygons will display at the bottom of the map.

For a circle, your first tap will be the center of the circle, and your second tap will set the radius

If you select the Import button, you can select Circle or Polygon, give the zone a name, and add specific Longitude and Latitude for either multiple points of a polygon, or just one for the radius of the circle.
You can also download a spreadsheet template.
After you’ve created the custom unlock areas, select the time range, the altitude, provide the reason for unlocking, and upload the authorization file per the guidelines.
Then click Submit.
How long does DJI take to confirm a custom unlock?
DJI strives to review and process all custom unlock requests for Authorized, Restricted, and Altitude Zones within 30 minutes.
You can review your unlock requests, and can sort them by Waiting for Review, Under Review, Accepted, or Rejected.
You will receive an email notification regarding your application. After the Unlock request has been accepted by the Fly Safe team, you are issued an unlocking certificate that must be downloaded to your drone using the DJI Pilot App.

Downloading and enabling your Custom Unlock Certificate
Once your unlock request is accepted, you’ll be issued an unlocking certificate that must be downloaded to the drone using the DJI App.
Remember, this process requires an internet connection, and so, it may be a good idea to download the certificate package before going to the field.
DJI will send you an email confirming your unlock request with a link to instructions to follow to download the unlock certificate for various DJI apps. In this guide, we will look downloading the unlock certificate on the DJI Pilot app.
Note, an internet connection is required for steps 1 to 5.
1. Power on drone, remote controller and mobile device/Crystal Sky if applicable.
2. Launch the DJI Pilot App, and you should see drone name in the bottom left designating connection.
3. In the DJI Pilot App, tap on the menu icon in the top right corner. Then tap on NFZ Unlocking Applications/Geo Zone Unlocking.

4. Tap the Refresh button in the top right and you will get a notification about new unlocking packages. Tap on the Details button to proceed.

5. Then you will have an option to Import the unlocking licenses onto the aircraft. What this does is import the unlocking certificate to the aircraft itself, where it is stored.

6. You can then turn the unlock certificate on and toggle the checkboxes in order to accept.

7. Now that the unlock certificate has been downloaded to the drone when you turn on the drone and the remote controller, you can easily pull up your GEO zone unlock certificates to check that they are enabled to conduct your flight. If it’s not there, you will need to download and enable it.
You can tap on an individual unlocking certificate to see the type, validity, status, and aircraft serial number it is for.
