
Using Klau Geomatics PPK Software with DJI RTK Drones
Activating the software:
When you run the software for the first time the following dialogue will appear: -

Enter the software serial number that you have received at the time of purchasing the software then click on ‘Generate Request Code’ and send the generated Request code to contact@klauppk.com to receive your product key.
Once you receive the product key, paste that in the text field above the ‘Activate’ button and press ‘Activate’ to start using the software.
Step by Step procedure:
After running the software, you will need to follow the ‘Workflow’ items located on the left hand side panel of the software as follows:

Click on ‘1. Import Drone Rinex File’ button and select the .obs file from your mission. This file is normally created in the same folder as your P4PRTK image folders.
NOTE: the M300 does not create a .obs file. Type *.DAT into the file selection box to see the raw data file to select.
Click on ‘2. Import Time Stamp MRK file’ and select the .mrk file from the image folder
Click on ‘3. Import Base Rinex File’ to open base station data. This data is required for PPK post processing and can be either from a local base station or CORS service providers (see below for the options).
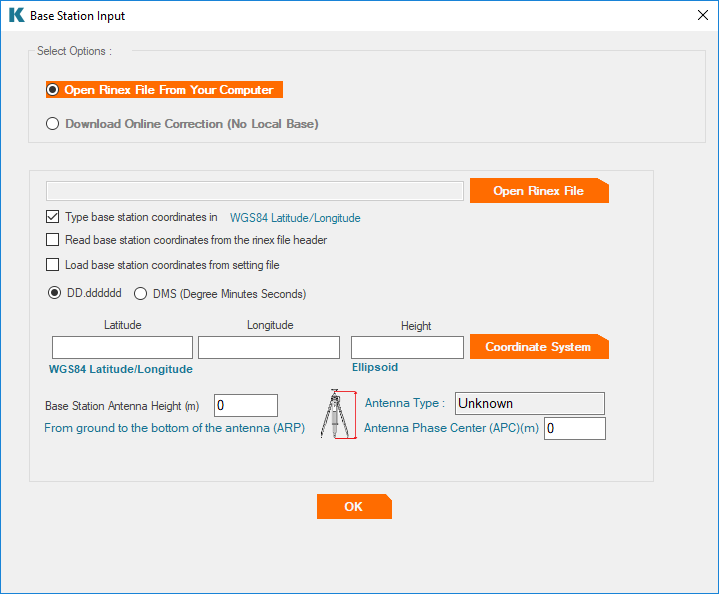
To open a rinex file from your computer click on ‘Open Rinex File From Your Computer’ and select the rinex data from your base station. Note that rinex file should have the relevant navigation files (.*n and .*g) in the same folder. Then type the coordinates of your base station with other required fields. Base station antenna height and its APC centre will be extracted from the rinex header but can be edited if required.
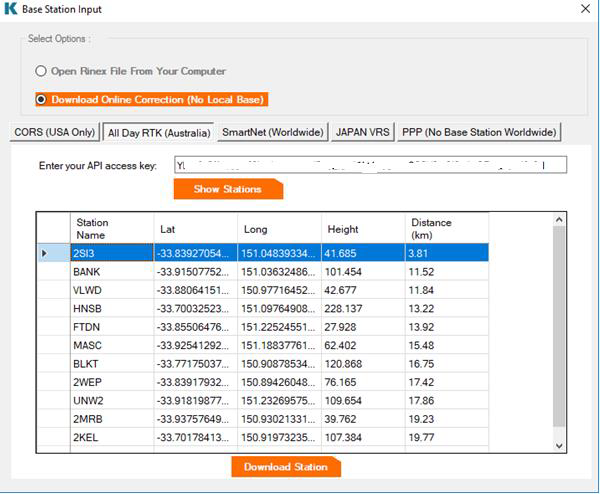
Another option for base station data is automatically downloading from CORS or data providers. To see the list of available options, click on the ‘Download Online Correction (No Local Base)’ option:

If you are based in the US, the first tab will display the list of freely available CORS base stations with their distance from the project area. You can select one of the stations and click on ‘Get Corrections’.
If you are based in Australia, click on the second tab ‘AllDay RTK (Australia)’ to see the list of available base stations nearby your project area. You will need to obtain your API key. Contact us to learn more about AllDay RTK.
Another available option is Hexagon ‘SmartNet (Worldwide)’ service as follows, similar to the other paid services you need to have an account with SmartNet and use your username and password to access the list of available stations.

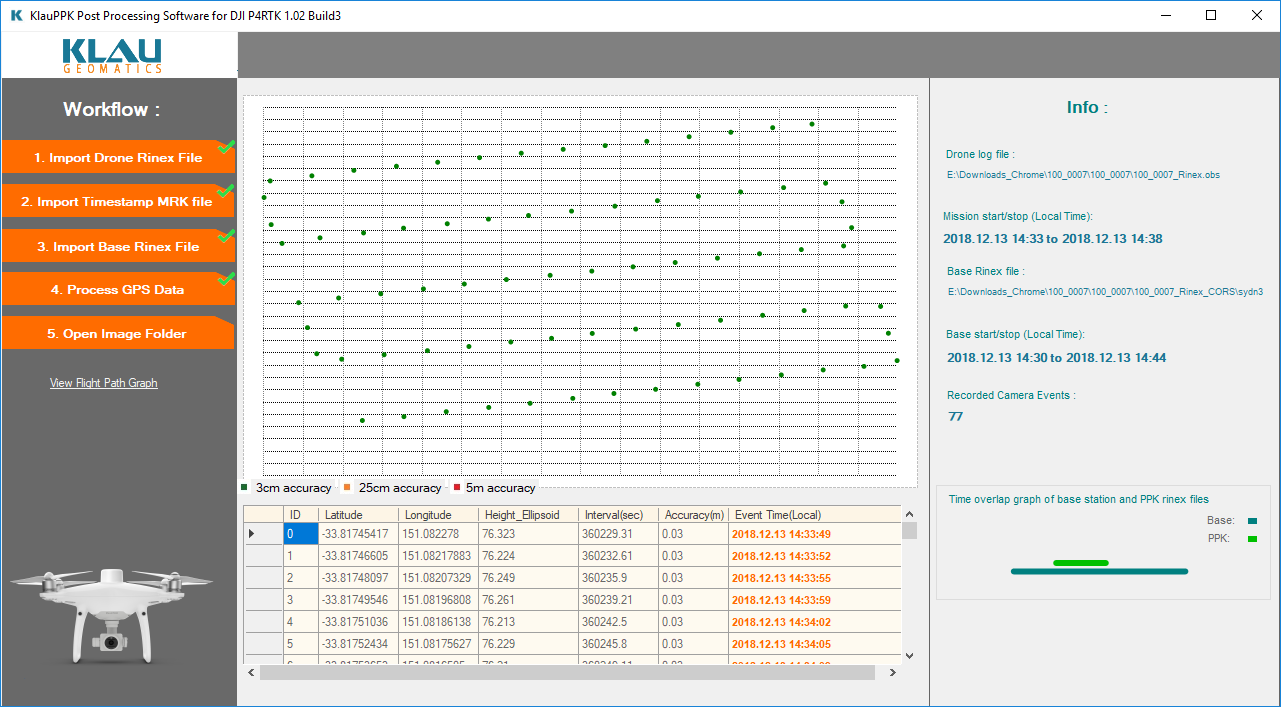
Once the base station is downloaded you will be prompted to continue for the next step and process the GPS data:

The right-hand side panel will display useful information including start and stop time of your mission, number of expected images and time overlap graph with your base station and drone rinex file.
Click on ‘4. Process GPS Data’ and wait until the list of processed coordinates are displayed as follow:
From the next step click on ‘5. Open Image Folder’ and select the image folder to import. This will assign post-processed GPS coordinates to photos:

From this window you can change the coordinate system of your camera positions, define local coordinate system, set the height reference and export them as external file or geotag photos. To change the coordinate system, click on ‘Change Projection’ button and select the relevant coordinate system and height references:

If you would like to define a site localisation which is normally used in mining or construction sites, click on ‘Local Site/Custom Coordinate System’ and then click on ‘Add New’ button.

To define a site localisation, you can create a text file with at least 5 pairs of coordinates in the local site coordinate system and geographic WGS84 system (6 columns separated by space and columns order must be the same as the column’s name displayed in the above-mentioned picture). Once coordinates are imported, click on ‘Calculate Residuals’ to see the errors on each point and if they are within your expectation click on the ‘Save as Local Site Projection’ button and give it a name to save.
You can then access the saved local coordinate system from the ‘Local Site/Custom Coordinate System’ dropdown list to change the coordinate system of all the photos to your local site system.
As the final step, you can export the photo coordinates as a CSV file and import them in your photogrammetry software (make sure to set the camera accuracy based on the reported accuracy column in your photogrammetry software) or click on Geotag photos to write the post-processed coordinates to the image header.
Contact us at info@prismatech.com.au for a two week free trial for KlauPPK software to use with your DJI RTK drone. More information on KlauPPK software for P4 RTK/M210 RTK V2/M300 RTK can be seen here.